Appearance
Quick Tour of the Console
About 1426 wordsAbout 5 min
2026-09-01
The console is your starting point for finding reports, creating analyses, and managing the resources behind them. If you only need to read a report, start with Public, Favorites, or Recent. You do not need to configure a data source or build a model first.
This tour uses the English interface. The screenshots show an administrator account; your menus and available actions depend on your permissions and the features enabled in your deployment.
Start from Home
Select Home in the left sidebar to return to the starting page. If your account opens a custom home page after sign-in, use this menu to reach the console home page.

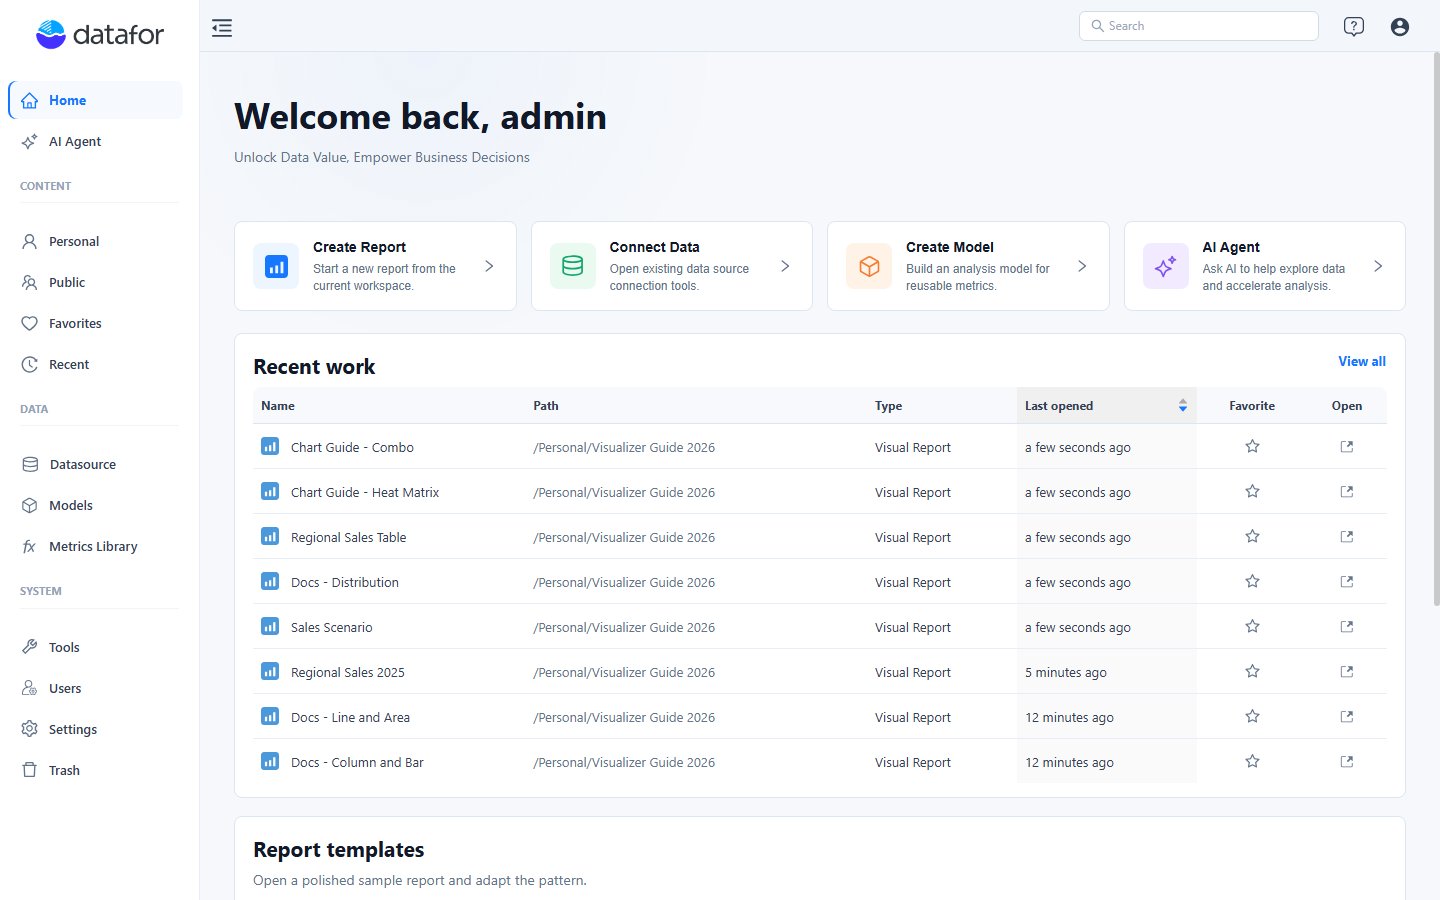
The four shortcuts under What would you like to do next? provide entry points for common tasks:
| Shortcut | Use it to |
|---|---|
| Create Report | Open the report designer and build an analysis using an available model. |
| Connect Data | Open data source management to connect data for analysis. |
| Create Model | Start building a reusable analysis model over your data. |
| AI Agent | Open the AI assistant to explore a model with natural-language questions. Access requires AI Agent to be configured and enabled for your account. |
Recent work lists recently opened resources with their paths, types, and last-opened times. Use a row's Open icon to resume work or its star to add it to your favorites. Select View all to open the full Recent list.
Scroll down for Report templates and Learn & resources. Templates provide sample report layouts to explore. The learning cards link to Getting Started, New Features, and the Help Center.
The sidebar groups the rest of the console into Content, Data, and System. Use the menu-fold button at the top left of the workspace to collapse the sidebar when you need more room.
Find and organize reports
Choose the right content view
- Personal is your own working area for reports and folders. Use it to organize drafts before placing content in a shared location.
- Public is the shared content area. The folders and reports you can use are controlled by resource permissions. “Public” does not mean anonymous access or permission for every user to edit.
- Favorites is a shortcut list for resources you have marked as favorites. Favoriting a report does not copy it, move it, or grant access to another person.
- Recent helps you return to resources you opened earlier. It is an activity list, not a separate storage location or a backup.
Always check the folder path when saving or moving a report. A report's location and its access permissions are separate concerns; do not use the name Personal or Public as a substitute for checking permissions when handling sensitive content.
Work inside a folder
- Open Personal or Public, then click a folder name to enter it.
- Use the breadcrumb path above the list to return to a parent folder.
- Select New > Folder to organize content, or New > Report to start a report. These actions require the relevant creation permissions.
- Click a report name to open it. To change its design, use Edit from its row's Actions menu.
Hover over a resource row to reveal the favorite control and the three-dot Actions button. Depending on the resource and your permissions, the menu can include Edit, Rename, Download, Copy, Move, Delete, and View item lineage. Lineage helps you inspect resource dependencies before making changes.

The list shows Modify time, Modified by, Create time, and Creator, helping you distinguish similar reports. Use the search field above the list to narrow the contents of the current folder; enter your search and press Enter. Clear the search to show the list again.
Search across the console
Use the Search field in the top bar when you do not know which folder contains a resource:
- Enter a resource name or part of its name.
- Press Enter and wait for the results.
- Check the result category and path, then select the resource you need.
Results are grouped by resource type, such as reports, folders, and models. The path helps distinguish resources with the same name. This search finds saved resources; it does not search the rows inside a report or database table. Use report filters or the AI assistant for questions about the data itself.

If a resource is missing, try a shorter name, check its location with the owner, and confirm that your account has access. An empty search result does not by itself mean the resource was deleted.
Understand the Data section
These three areas serve different purposes:
| Area | What belongs here | When to use it |
|---|---|---|
| Datasource | Database connections and file-based data sources. | Connect data or manage an existing connection. |
| Models | Analysis models that organize tables, relationships, dimensions, and measures. | Prepare reusable fields and calculations for reports and AI-assisted analysis. |
| Metrics Library | Business definitions of metrics, including their meaning, ownership, and calculation rules. | Agree on what a metric means and connect its definition to implementations in models. |
A data source supplies the data; a model makes that data usable for analysis; the Metrics Library documents the business meaning of metrics. A metric definition alone is not a queryable data source. If an appropriate model already exists, reuse it when creating a report.
See Analysis Model Overview and Metrics Library for the details.
Know which System area you need
The System group contains both authoring utilities and administrative functions. It is not exclusively an administrator menu, and not every user sees every entry.
Tools
Tools contains:
- Parameters for global parameters and system variables.
- Dictionary for mapping stored keys or codes to display values used in analysis models. See Data Dictionary.
- GeoJSON for managing geographic map resources. See GeoJSON Map.
Use Settings, not Tools, for system-wide configuration such as login integration or database drivers.
Users and Settings
Users provides Users, Roles, and User Type management. Settings provides deployment configuration, including mail, backups, audit logs, AI Agent, appearance, JDBC drivers, the OLAP engine, authentication integrations, and map services. These are administrator functions, not prerequisites for reading a report.
If you need a missing feature, ask your administrator to check your account capabilities and deployment configuration. See User Creation and User Types.
Trash
Trash lists deleted resources retained for recovery, including reports, folders, and models. Check the resource type, creator, and deletion time before choosing an item. Use its Actions menu to select Restore or Delete permanently.
Delete permanently and Delete all remove resources from Trash; you cannot recover them through the console afterward. Delete all applies to the entire Trash list, not just the rows matching a search. Do not treat Trash as a backup of source databases or assume every kind of deleted data appears here.
Help and personal preferences
The top-right icons provide access without leaving the console navigation:
- Help icon > Documentation opens the help site. About displays the installed version; include it when reporting a problem.
- Profile icon > My account opens your personal information, language, and home-page preferences. Use Language to switch the interface language. See My Account.
- Profile icon > Logout signs you out. Save any report or model changes before leaving.
Why your screen may look different
A reader may not see Personal, the Data section, or creation controls. Users and Settings require administrative access. Individual resource actions also depend on permissions, so being able to open a report does not necessarily let you edit, move, or delete it.
Resource access and data access are also different: permission to open a report does not define which rows or columns a user may query. Use Access Control List for resource permissions and Data Security for data restrictions.
Try your next task
Build and save a report with Create Your First Analysis Report, or explore an existing model with the AI Assistant.