
Appearance
Backup and Restore
Overview
Datafor provides backup, restore, and backup upload functionalities to ensure data security and availability. Users can perform manual backups, schedule automatic backups, and upload locally stored backup packages for restoration when needed.
1. Backup Content
Datafor allows users to select from the following backup types:
- Software: Includes Datafor core software and plugins, enabling system software restoration.
- Database: Contains user information, analytical models, reports, and configuration settings, ensuring data integrity.
- Uploaded Files: Includes user-uploaded datasets such as Excel and CSV files, preserving external data sources.
2. Backup Management Interface
Key Function Buttons
The “Backup and Restore” interface provides two essential operations:
Backup Button (Manual Backup): Initiates a new system backup.

Upload Button (Upload Backup Package): Uploads a locally stored backup file to restore data.

Backup Records

Users can view all previously created backups, including:
- Backup Time
- Backup Content
- Creator
- Status:
- 🟢 Green: Backup successful
- 🟡 Yellow: Backup in progress
- 🔴 Red: Backup failed
3. Backup Operations
3.1 Performing a Manual Backup
Steps:
In the “Backup and Restore” interface, click the Backup Button.
Select the desired backup content (Software / Database / Uploaded Files).
-C4JSVaJL.png)
Click “OK” to start the backup process. The backup progress will be displayed in the list.
3.2 Uploading a Local Backup Package
Datafor allows users to upload previously downloaded local backup packages for restoration or migration.
Steps:
- In the “Backup and Restore” interface, click the ⬆ Upload Button.
- Select the locally stored backup file (Software / Database / Uploaded Files).
- Click “Confirm Upload”, and the system will process the backup file.
- Once successfully uploaded, the new backup entry will appear in the Backup List, ready for restoration.
3.3 Restoring a Backup
Steps:
In the “Backup and Restore” interface, locate the backup you want to restore.
Click the “Restore” button.
-DVjexjOC.png)
Confirm the restore operation. The system will initiate data restoration.
Warning: Restoring a backup may overwrite existing data. Proceed with caution.
3.4 Downloading a Backup
Steps:
In the Backup List, find the backup file you want to download.
Click the “Download” button.
-Dr8apZuA.png)
The backup file will be exported to local storage.
Recommendation: Regularly download backups and store them on external disks or cloud storage to ensure data security.
3.5 Deleting a Backup
Steps:
- In the Backup List, locate the backup to delete.
- Click the “Delete” button.
- Confirm the deletion, and the system will remove the backup.
Note: Deleted backups cannot be recovered. Proceed with caution.
4. Setting Up Scheduled Backups
Users can create scheduled automatic backups to ensure data is regularly backed up at specified intervals.
Steps:
In the “Backup” interface, click the “New Schedule” button.

Enter a schedule name (e.g., "Weekly Backup").
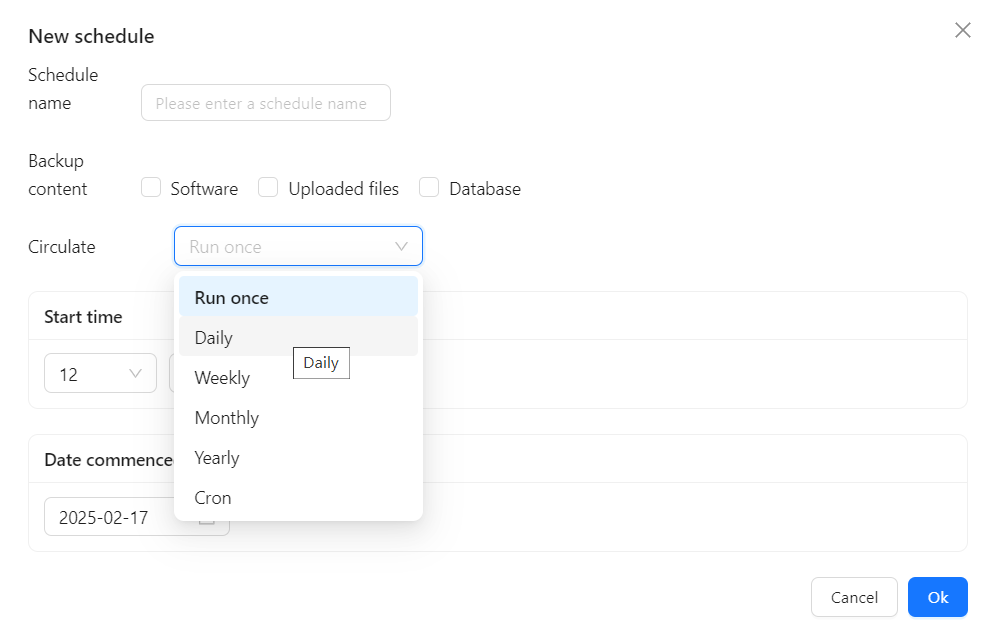
Select the Backup Content (Software / Database / Uploaded Files).
In the Circulation (Frequency) option, choose the backup schedule:
- Run once (One-time backup)
- Daily (Daily backups)
- Weekly (Weekly backups)
- Monthly (Monthly backups)
- Yearly (Yearly backups)
- Cron (Custom schedule)
Set the Start Time and Start Date.
Choose End Date or No End Date to keep the schedule running indefinitely.
Click “OK” to save the scheduled backup task.
5. Best Practices
- Regular Backups: It is recommended to perform a full backup at least once a week to ensure data security.
- Storage Management: Periodically delete outdated backups to free up storage.
- Pre-Upgrade Backup: Always perform a full backup before system upgrades or major changes to prevent data loss.
- External Storage: Download and store important backups on external drives or cloud storage to protect against system failures.